Setup for your Windows Email Clients
Please read instructions below for setting up your email on your Windows Desktop or Laptop
This section will help you setup your email clients on your windows Desktop or Laptop. Please read instruction carefully and ensure to change all shown information to you supplied information for this to work correctly.
Please contact us should you have any issues.
Microsoft Outlook
This tutorial shows you how to set up Microsoft Outlook 2003® to work with your e-mail account. This tutorial focuses on setting up Microsoft Outlook 2003, but these settings are similar in other versions of Microsoft Outlook. You can set up previous versions of Microsoft Outlook by using the settings in this tutorial.
To Set Up Your E-mail Account in Microsoft Outlook
- In Microsoft Outlook, from the E-mail Accounts menu, select Tools.

- On the E-mail Accounts wizard window, select Add a new e-mail account, and then click Next.

- For your server type, select POP3 or IMAP, and then click Next.

- On the Internet E-mail Settings (POP3/IMAP) window, enter your information as follows:
- In Microsoft Outlook, from the E-mail Accounts menu, select Tools.
- Your Name
- Your first and last name.
- E-mail Address
- Your email address.
- User Name
- Your email address, again.
- Password
- Your email account password.
- Incoming mail server (POP3)
- POP, mail.yourdomain.co.za or IMAP, mail.yourdomain.co.za
- Outgoing mail server (SMTP)
- mail.yourdomain.co.za
Click More Settings.

- On the Internet E-mail Settings window, go to the Outgoing Server tab.
- Select My outgoing server (SMTP) requires authentication.
- Select Use same settings as my incoming mail server.

- Go to the Advanced tab, and then change the Outgoing server (SMTP) port to 25
- Click OK.

- Click Next.

- Click Finish.

Outlook Express
This tutorial shows you how to set up Microsoft Outlook Express 6 to work with your e-mail account. This tutorial focuses on setting up Microsoft Outlook Express 6, but these settings are similar in other versions of Microsoft Outlook Express®. You can set up previous versions of Microsoft Outlook Express by using the settings in this tutorial.
To Set Up Your E-mail Account in Microsoft Outlook Express
- In Microsoft Outlook Express, from the Tools menu, select Accounts.

- Go to the Mail tab and from the Add menu, select Mail.

- In the Display Name field, enter you full name and click Next.

- In the E-mail address field, enter your email address and click Next.

- On the E-mail Server Names page, complete your information as follows:
- In Microsoft Outlook Express, from the Tools menu, select Accounts.
- My incoming mail server is a
- POP3 or IMAP.
- Incoming mail (POP3, IMAP or HTTP) server
- POP mail.yourdomain.co.za. or IMAP mail.yourdomain.co.za.
- Outgoing mail (SMTP) server
- mail.yourdomain.co.za.
- (please replace yourdomain with your email domain provided by your webhost).
Click Next.

- In the Account Name and Password fields, enter your email address and password, and then click Next.

- On the setup confirmation page, click Finish.

- On the Mail tab, select the account you just created, and then click Properties.

- Go to the Servers tab.
- Select My server requires authentication, and then click Apply.

- Go to the Advanced tab.
- In the Server Port Numbers section, change Outgoing mail (SMTP) to 25, and then click OK.

- (Optional) If you want to keep a copy of email messages stored on your email provider’s servers, in the Delivery section, select Leave a copy of messages on server.
Your Outlook Express account is now set up. Click Close to close the Internet Accounts window and return to your Outlook Express.
Windows 10 Mail
This is a quick step-by-step guide to setting up email on Windows 10 Mail.
Please note: You need to have created a mailbox for your account before you can set up email your device.
How to setup email on Windows 10 Mail
STEP 1
Open Windows 10 Mail
Firstly, you’ll need to open Windows 10 Mail by clicking on the Start button, then clicking on ‘Mail’.

STEP 2
Choose ‘Settings’
Once Windows 10 Mail has opened, choose the ‘Settings’ icon (the cog) from the menu located at the bottom of the app.

STEP 3
Choose ‘Manage Accounts’
Then simple choose ‘Manage Accounts’ from the settings menu that appears on the right hand side of the screen.

STEP 4
Choose ‘Add account’
Then simple click on the option labelled ‘Add Account’.

STEP 5
Choose ‘Advanced setup’
After you have entered your e-mail address and password, choose ‘Advanced setup’ from the list of different account types.

STEP 6
Choose ‘Internet email’
Then choose ‘Internet email’ to set up your account details.

STEP 7
Enter your account details
You will be presented with some new form fields to fill in.
Firstly, enter your e-mail address in the field labelled ‘Account name’.
Next, enter your full name in the field labelled ‘Your name’‘. This will appear in the ‘from’ field, when you send e-mail from this address.
In the field labelled ‘Incoming email server’ please enter ‘mail.34sp.com’.
Then choose your protocol via the ‘Account type’ dropdown menu (we strongly recommend IMAP).
Enter your e-mail address in the field labelled ‘Email address’, then enter your e-mail address again for the field labelled ‘Username’.
In the ‘Password’ field, enter the password associated with your e-mail address.
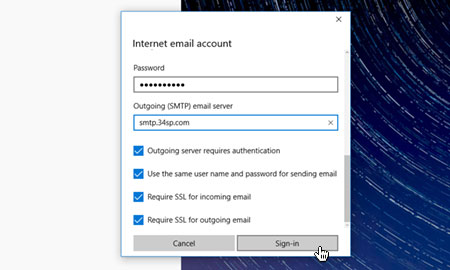
For ‘Outgoing (SMTP) email server’ please enter ‘smtp.34sp.com’.
Finally, ensure the 4 checkboxes at the end of the form are all checked.
When you have entered the relevant details, click ‘Sign-in’ to proceed to the next stage.

STEP 8
Windows 10 Mail Setup is complete
If you have entered your account details correctly, you’ll see a message reading ‘All done! – Your account is setup’. Simply click the button labelled ‘Done’ to complete the setup process. You are now ready to send and receive email using Windows 10 Mail.

